


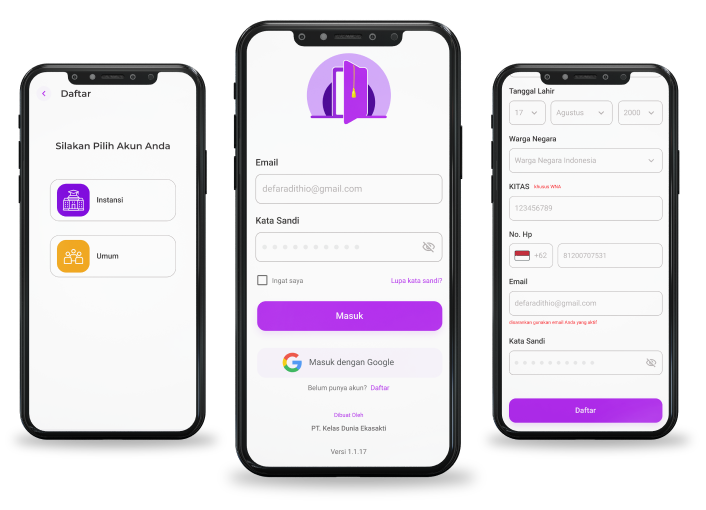
As a first step in using the Kelas Digital Application, users are required to create a user and password.
The Steps:
- Press "Sign Up" menu.
- Select account type "Institution or General".
- Fill in all available fields such as username, email, password, etc.
- Press button “Register”.
Notes:
There are 2 types of accounts
- a. Institution, is an account whose registration is through the institution/campus.
- b. General, is an account where registration is carried out individually.
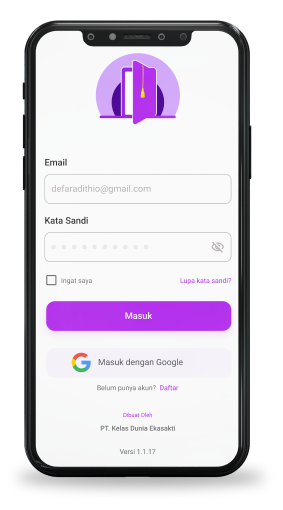
The Steps:
- input your “email”.
- input your “password”.
- press the “remember me” check box if you want to log in automatically.
- press button “login”.

The Steps:
- Tekan “Lupa Kata Sandi?”.
- Masukan Email Kelas Digital Anda.
- Tekan tombol “Kirim”.
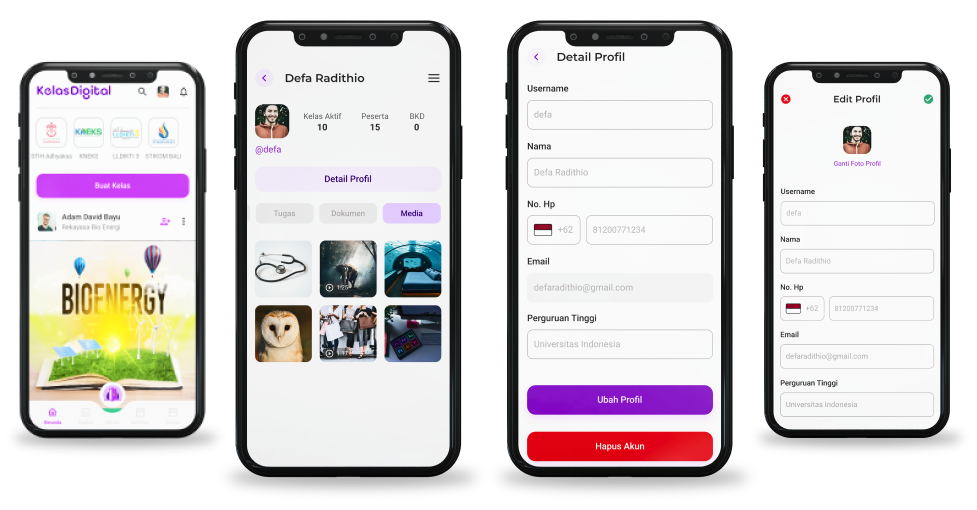
The Steps:
- Tap your profile photo.
- Press button “Profile Details”.
- Press button “Update Profile”.
- Please change the data you need to update.
- Press the “Tick” icon to save.

A. Add Contact
This stage is for adding contacts, before starting communication/chat with other registered users.
The Steps:
- Press the "Dashboard" menu.
- Select “Contact” on the Dashboard page.
- Press the “Search/Magnifying Glass” icon then type the name of the user you are looking for.
- Press the "Add Contact" icon to add it to our contact list.
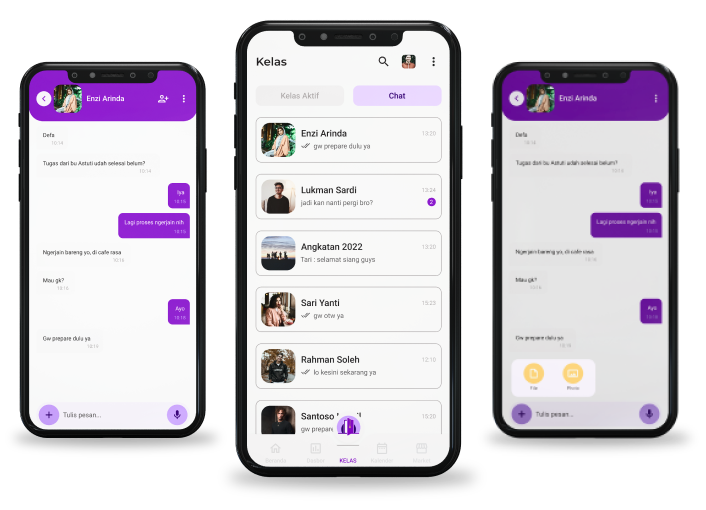
B. Personal Chat: Upload Files, Photos and Links
This stage is to be able to communicate with other Kelas Digital users in your contacts.
The Steps:
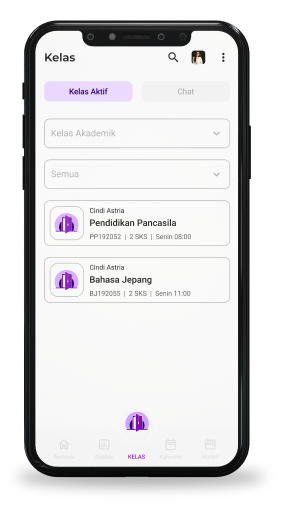
- Press the "Class" menu.
- Press button “Chat”.
- Select the related contact.
- Write your message then press the "Send" icon.
- Press the “+” button if you want to send files or photos.
- If you want to send a link, please copy and paste the link in the message column then press the "Send" icon.
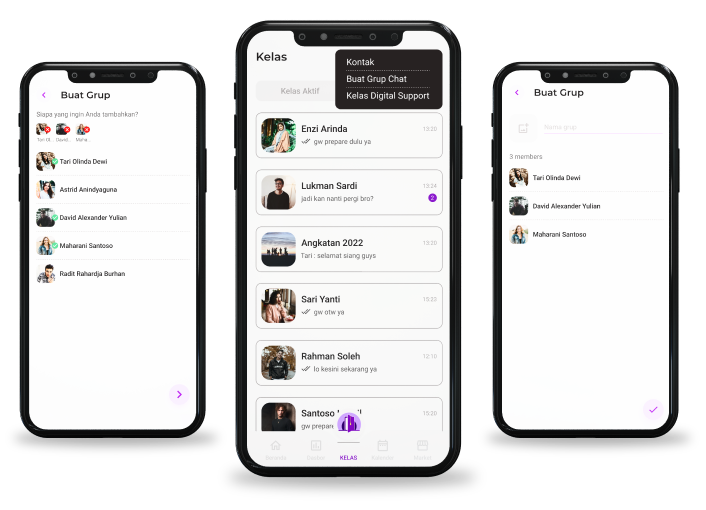
C. Create a Chat Group
This stage is to create a group to be able to communicate with several other users who are members of the group.
The Steps:
- Press the "Class" menu.
- Press button “Chat”.
- Press the three dot icon, then select "Create Chat Group".
- Select the contacts you want to add to the group.
- Press the “>” button at the bottom right.
- Press the “Image” icon to select a group photo.
- Type the group name you want.
- Press the “Check” button to complete the chat group creation process.
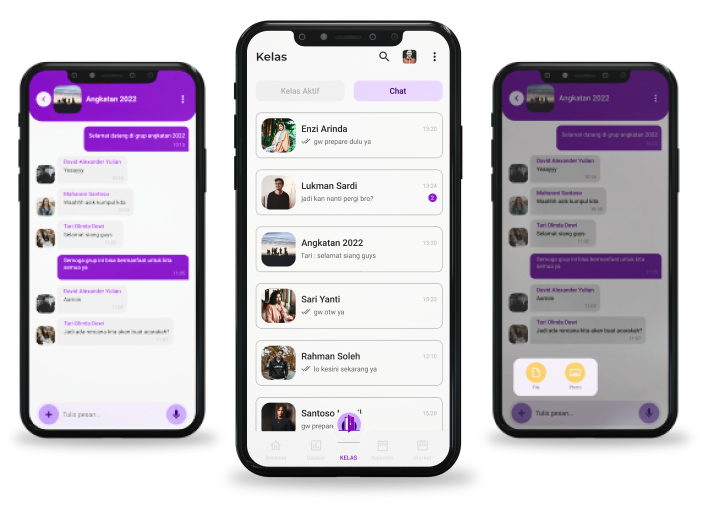
D. Chat Group: Unggah File, Photo dan Link
This stage is to start communication within the group that has been created or registered as a member of the group.
The Steps:
- Press the "Class" menu.
- Press button “Chat”.
- Select the related chat group.
- Write a message then press the "Send" icon.
- Press the "+" icon below, if you want to send a file or photo.
- If you want to send a link, please copy and paste the link in the message column then press the "Send" icon.
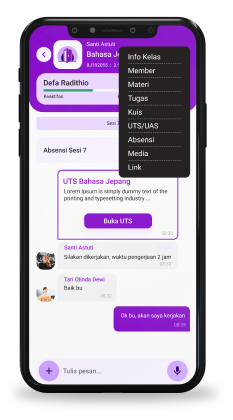
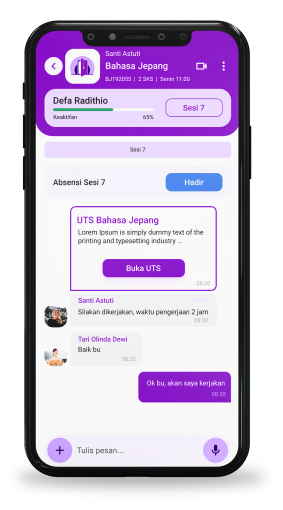
E. Class Chat: Upload Materials, Assignments, Quizzes, UTS/UAS, Files and Photos (Lecturer)
This stage is to start communicating with students in the classes that have been created/assigned.
The Steps:
- Press the "Class" menu.
- Choose your class.
- Write your message, then press the "Send" icon.
- Press the "+" icon if you want to upload materials, assignments, quizzes, UTS/UAS, files and photos.
- If you want to send a link, just copy and paste the link in the message column then press the "Send" icon.
F. Class Chat: Upload Files, Photos and Links (Students)
The steps are the same as Class Chat (Lecturer), the difference is that you can only upload Files, Photos and Links.
This is an activity to start communicating with lecturers/teachers in classes that have been taken/registered.
The Steps:
- Press the "+" icon if you want to send files or photos.
- If you want to send a link, just paste the link in the message column then press the "Send" icon.
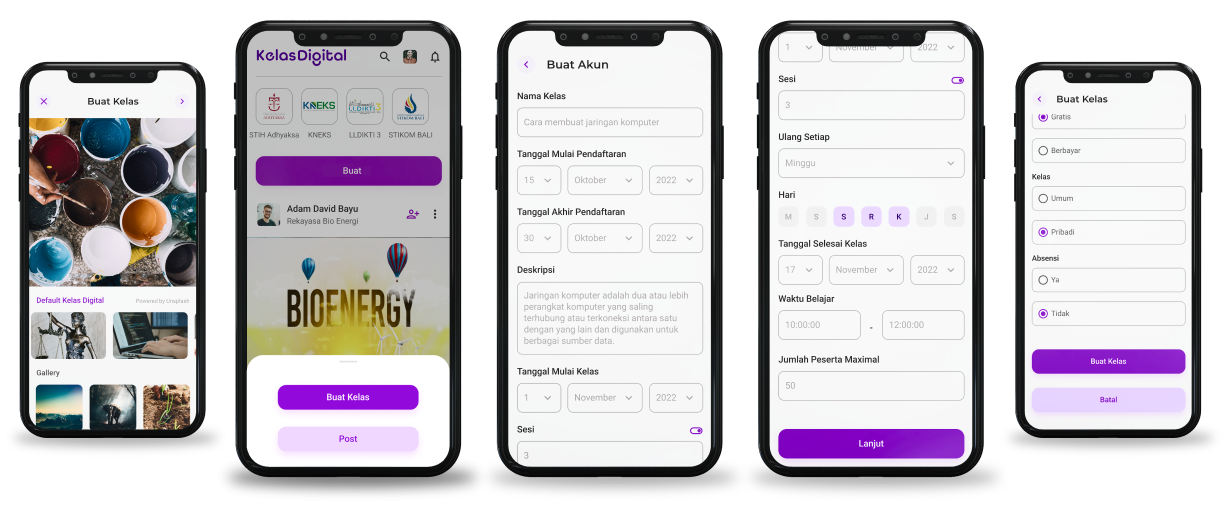
This stage is used if a lecturer or individual wants to create a private or additional class other than the scheduled classes from each institution.
The Steps:
- Press button "Create", then select "Create Class".
- Select an image for your class, then press the right arrow.
- Fill in all available fields such as class name, registration start date, registration end date, description, etc.
- Press button “Continue”.
- Decide on free or paid classes.
- Select the class type to private or public. If you choose private, then you are asked to create a pin which is a combination of letters and numbers.
- Choose whether classes include absences or not. If yes, you will be asked to determine the start time of the absence.
- Then press button “Create Class”.
Notes:
Scheduled classes from each institution can be seen in the "Active Classes" menu.
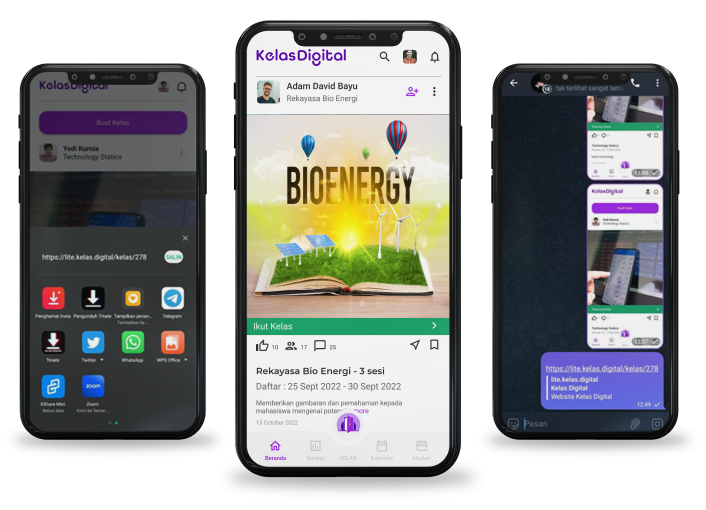
This stage is used by lecturers/teachers to send invitations for students to take part in the (private) classes that have been created.
The Steps:
- After creating a class, you return to the menu “Home”.
- Press button “Share” (arrow image).
- Select the platform you want (for example, Telegram group or WhatsApp group).
- Students can join via the link you shared.
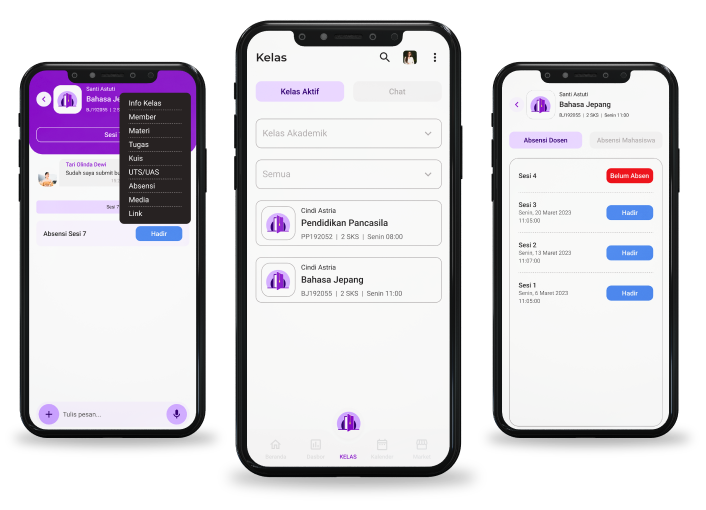
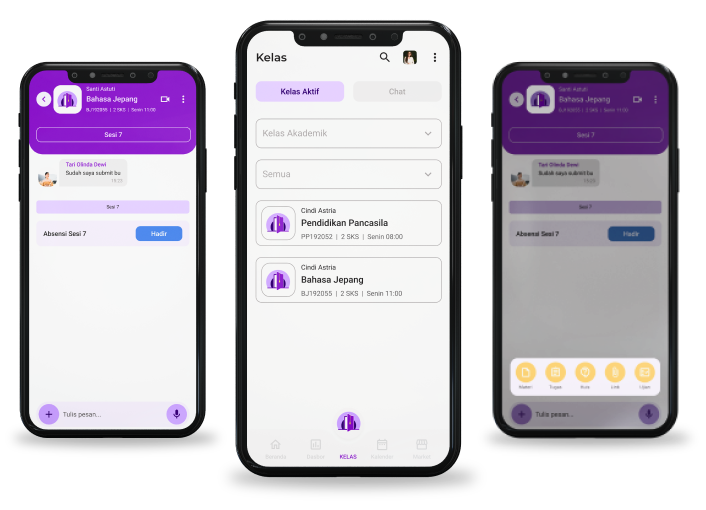
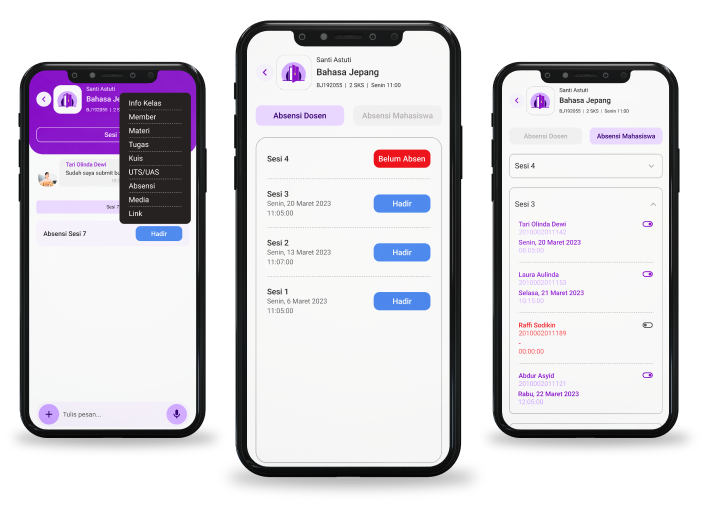
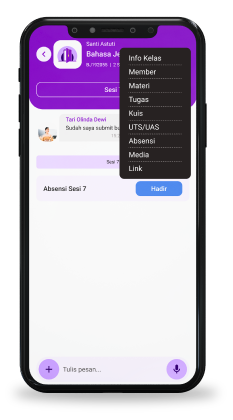
A. Absensi
This stage is used to record lecturer/teacher attendance for each active class session.
The Steps:
- Open the classroom that has been created/joined.
- Press button “Not Yet Absent” in the chat room (the color of the button becomes blue and it says “Present”).
Or
- Press the "Three Dots" icon in the top right corner.
- Select "Absence".
- Press button "Lecturer Absence" then press button "Not Yet Absent".
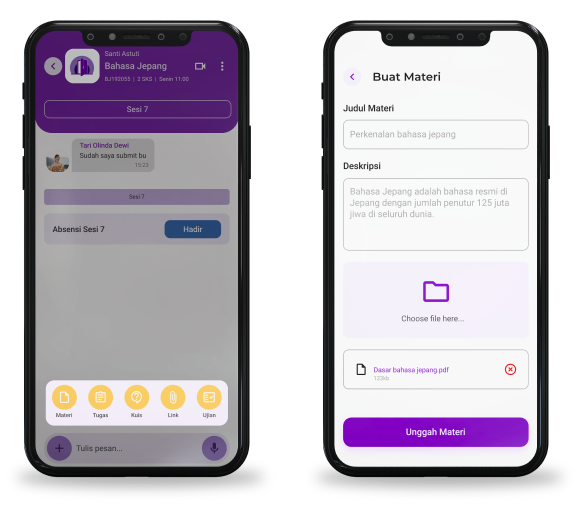
B. Upload Materials
This stage is used for lecturers/teachers to share/share material. The form of material can be in the form of .ppt, .pdf, .doc or image files, as well as in the form of links.
The Steps:
- Press icon "+" in the column "Message".
- Select icon "Material".
- Fill in the "Material Title" and "Description" fields.
- Press "Select File" to enter the material file.
- Press button "Upload Material".
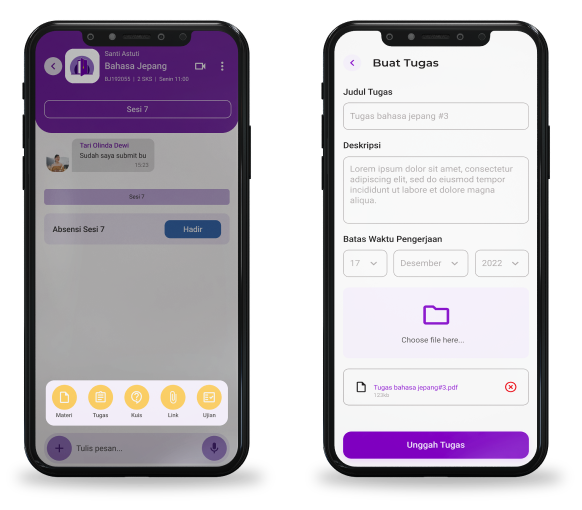
C. Upload Assignments
This stage is used for lecturers/teachers to divide/share assignments. The form of the assignment can be in the form of a .ppt, .pdf, .doc or image file, as well as in the form of a link.
The Steps:
- Press Icon “+” in the column "Message".
- Select icon "Tasks".
- Fill in the “Task Title” and “Description” fields.
- Select "Due" to determine the due date for the assignment to be submitted.
- Press "Select File" to enter the task file.
- Press the "Upload Assignment" button.
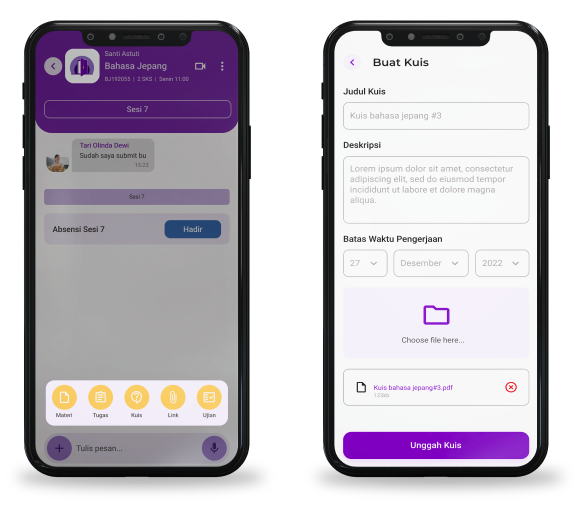
D. Upload Quiz
This stage is used for lecturers/teachers to share/share quizzes. The quiz format can be in the form of a .ppt, .pdf, .doc or image file, as well as in the form of a link.
The Steps:
- Press Icon “+” in the column "Message".
- Select icon "Quiz".
- Fill in the “Quiz Title” and “Description” fields.
- Select "Time Limit" to determine the time limit for the quiz to be submitted.
- Press "Select File" to enter the quiz file.
- Press button "Upload Quiz".
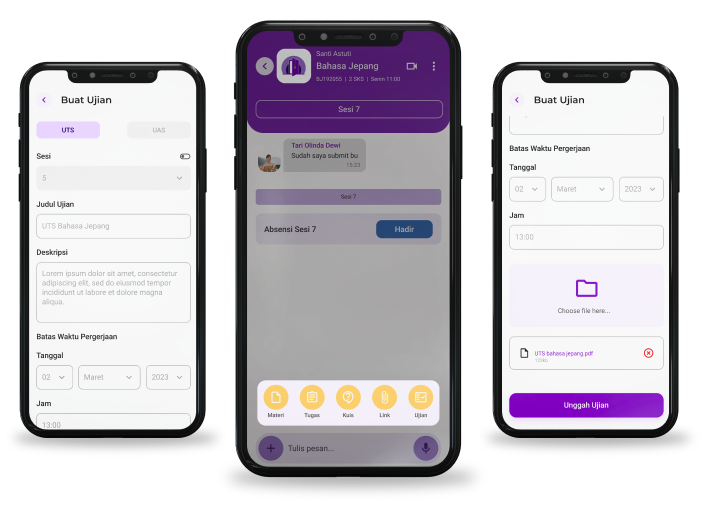
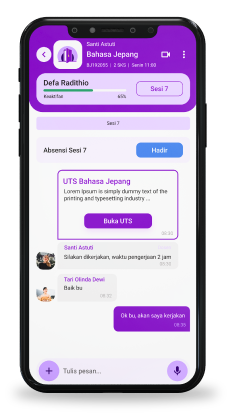
E. Upload UTS/UAS
This stage is used for lecturers/teachers to divide/share exams. The exam form can be in the form of a .ppt, .pdf, .doc or image file, as well as in the form of a link.
The Steps:
- Press Icon “+” in the column "Message".
- Select icon "Exam".
- Select button UTS/UAS.
- Select define session.
- Fill in the "Test Title" and "Description" fields.
- Determine the final date of the exam.
- Determine the final deadline for the exam.
- Press "Select File" to select the exam file.
- Press “Upload Test”.
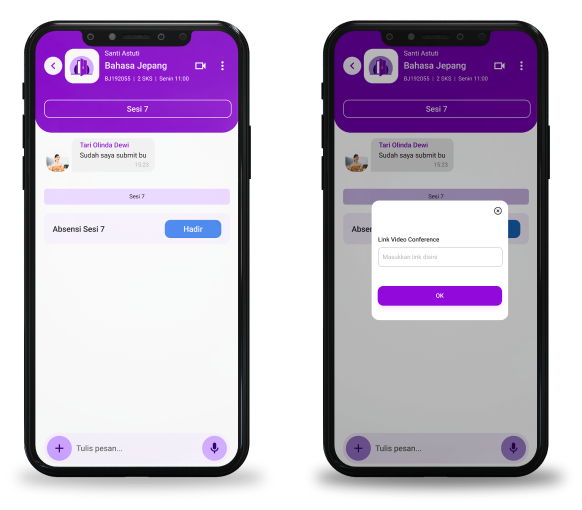
F. Making Video Conferences
This stage is used for lecturers/teachers to prepare online meetings using video conferencing applications such as ZOOM and Google Meet.
The Steps:
- Press icon “Video” in the top right corner.
- Enter the Video Conference Link that was previously prepared in the "Video Conference Link" column.
- Click icon “Video” again to start.
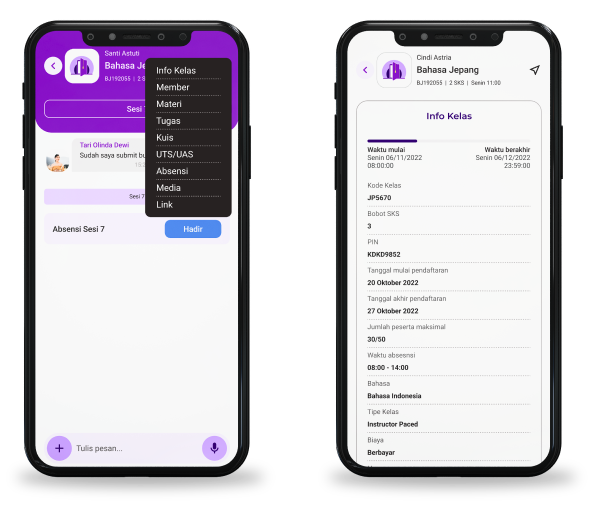
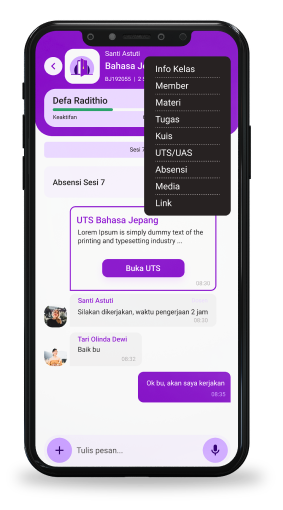
A.View Class Info
This stage is used for lecturers/teachers to find out related class information which contains information about the class such as class start date, number of participants, etc.
The Steps:
- Press the three dots in the right corner.
- Select “Class Info” and detailed class information will appear.
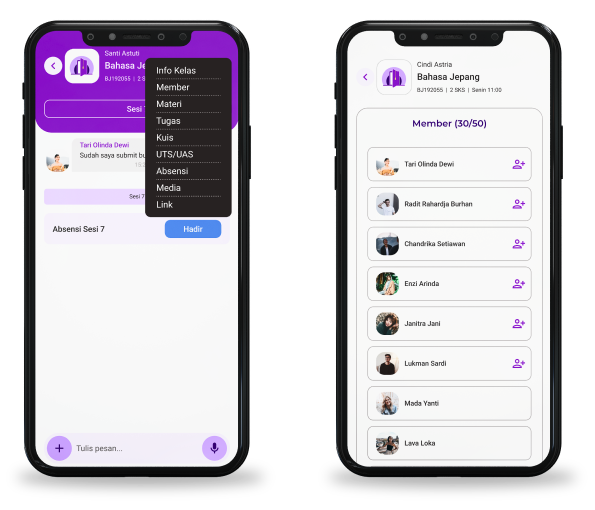
B. View Member List
This stage is used for lecturers/teachers to find out the names of students registered in the relevant class.
The Steps:
- Press the three dots in the right corner.
- Select “Member” and a list of members in that class will appear.
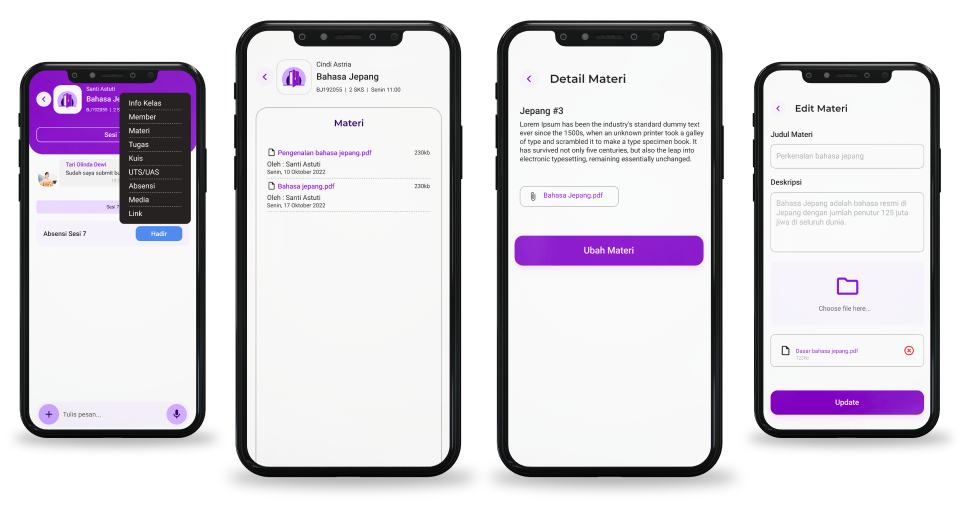
C. View/Download/Modify Materials
This stage is used for lecturers/teachers to view/download/change material that has been uploaded to the relevant class.
The Steps:
- Press the three dots in the right corner.
- Select “Materials” and a list of materials in that class will appear.
- Press the material file if you want to download.
- Press button "Change Material" if you want to make changes to the material.
- To save the results of material changes, please press button "Update".
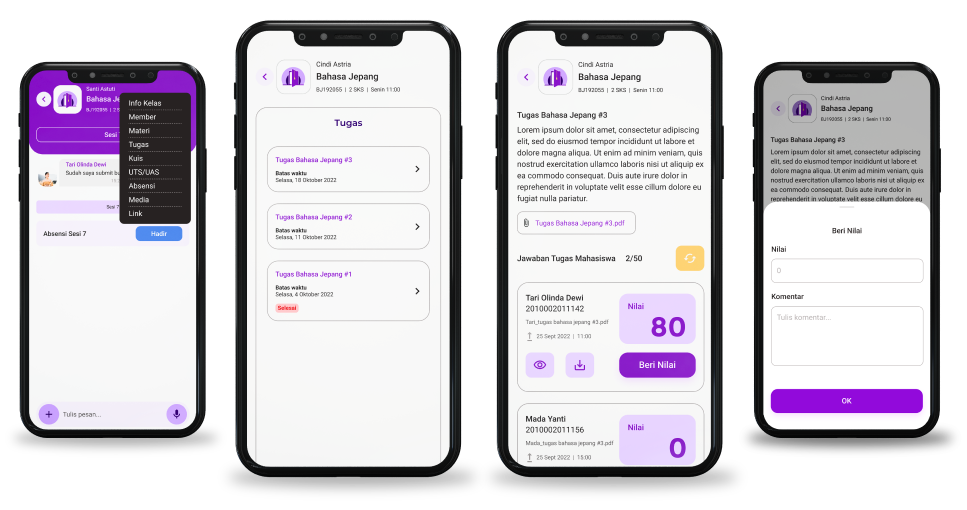
D.View/Download/Grade Assignments
Activities for lecturers/instructors to view/download/give grades to assignments that have been uploaded by students.
The Steps:
- Press the three dots in the right corner.
- Select “Assignments” and a list of assignments in that class will appear.
- Tap the assignment you want to view and grade.
- Press the task file if you want to view or download the file.
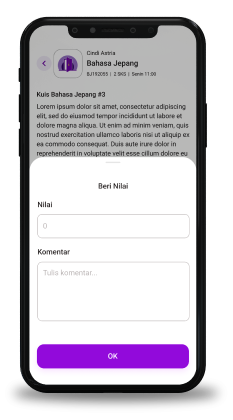
- Press button "Grade" if you want to grade student assignments and comment.
E. See Absence
Activities for lecturers/teachers to see their or students' attendance list.
The Steps:
- Press the three dots in the right corner.
- Select "Absence".
- Press button "Lecturer Attendance" to see a list of attendance status as a lecturer.
- Press button "Student Attendance" to see a list of student attendance status.
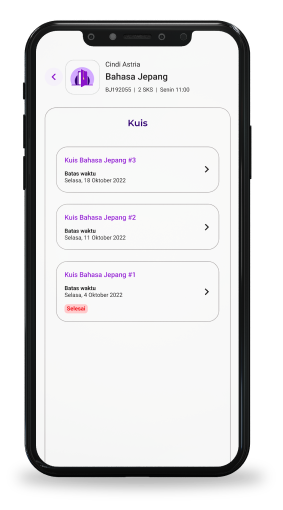
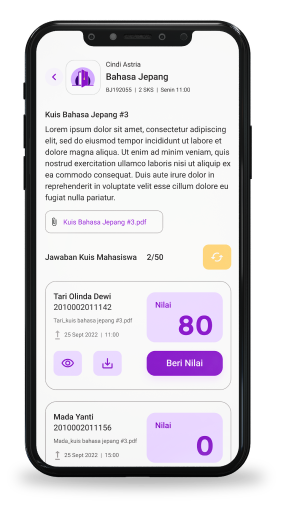
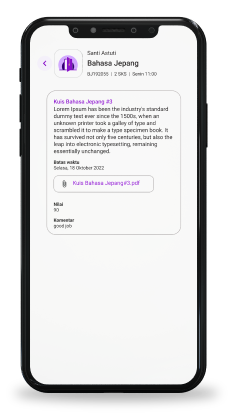
F. View/Download/Rate Quiz
Activities for lecturers/instructors to view/download/give quiz scores that have been uploaded by students.
The Steps:
- Press the three dots in the right corner.
- Select “Quiz” and a list of quizzes in that class will appear.
- Tap the quiz you want to view and rate it.
- Press the quiz file if you want to view or download the file.
- Press button "Give a Grade" if you want to give a student's quiz grade and comment.
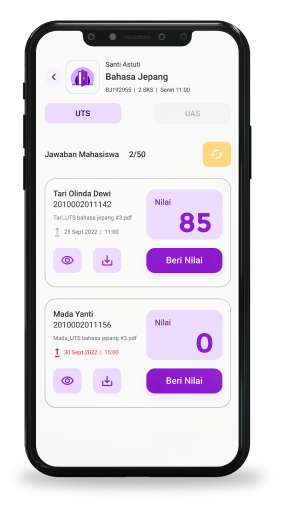
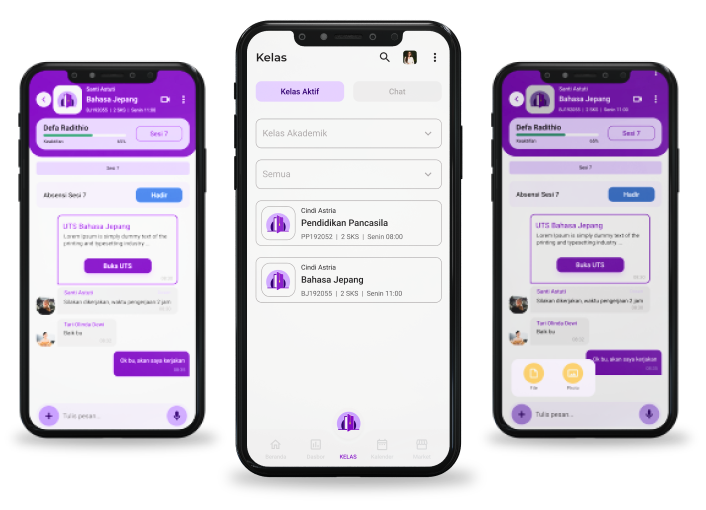
G. View/Download/Grade UTS and UAS
Activities for lecturers/instructors to view/download/provide UTS/UAS scores that have been uploaded by students.
The Steps:
- Press button "Open UTS" in the class chat room.
Or
- Press the three dots in the top right corner then select "EXAM" to give a grade, then select UTS/UAS.
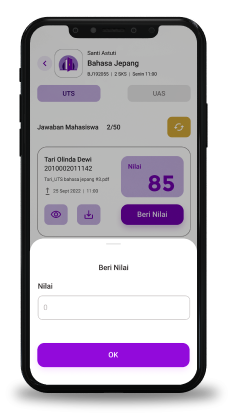
- Press icon "Download" to view the student's UTS/UAS answer sheet.
- Press button "Give Value" to provide the UTS/UAS value.
- Give a value to the value column, then press button "OK".
A. Absence
This stage is used to record student attendance for each active class session.
The Steps:
- Open a class you are already following/related to.
- Press button “Not Yet Absent” in the chat room (the color of the button becomes blue and it says “Present”.
Notes:
If the session has passed and you haven't clicked button "Not Yet Absent", the color of the button will become gray (inactive).
B. Download/View Materials
This stage is used for students to view/download material that has been uploaded by the lecturer/instructor in the relevant class.
The Steps:
- Open a class you are already following/related to.
- Search for related material in the chat room.
- Press button “Open Material” to download and view related materials.
Or
- Press the three dots at the top right, then select "Materials".
- Select the material you want to view or download.
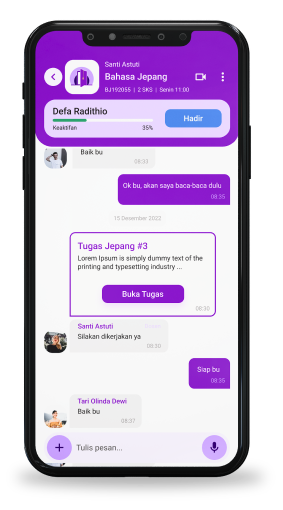
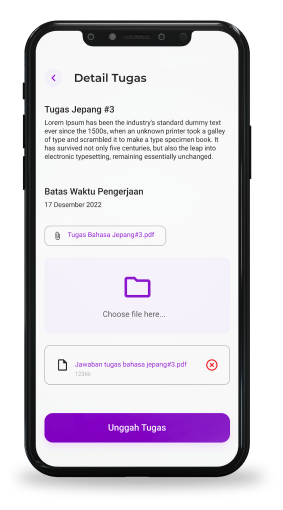
C. Download and Upload Assignment Answers
This stage is used for students to download assignments and upload assignment answers that have been uploaded by the lecturer/instructor in the relevant class.
The Steps:
- Open a class you are already following/related to.
- Look for related tasks in the chat column.
- Press button “Open Assignment” to download and view the related assignment.
Atau
- Press the three dots at the top right, then select “Tasks”.
- Select the assignment you want to view or download.
- To upload assignment answers, press select your answer file then press button "Upload Assignment".

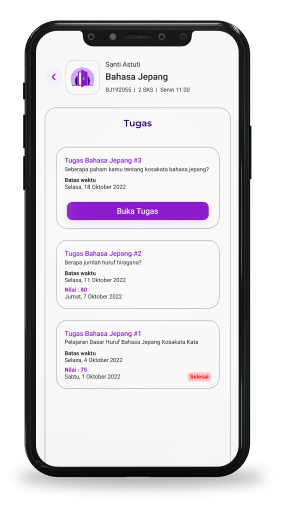

D. View Assignment Grades
This stage is used for students to see the grades of assignments that have been uploaded by the lecturer/teacher in the relevant class.
The Steps:
- Open a class you are already following/related to.
- Press the three dots at the top right, then select “Tasks”.
- Select the assignment for which you want to see the grade.

E. Download and Upload Quiz Answers
This stage is used for students to download quizzes and upload quiz answers that have been uploaded by the lecturer/instructor in the relevant class.
The Steps:
- Open a class you are already following/related to.
- Look for the related quiz in the chat column.
- Press button “Open Quiz” to download and view the related quiz.
Or
- Press the three dots at the top right, then select “Quiz”
- Select the quiz you want to view or download.
- To upload quiz answers, press select your answer file then press button “Upload Quiz”.

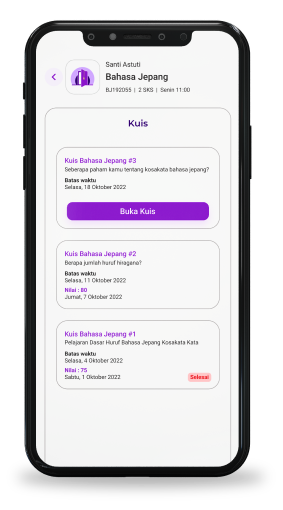
F. View Quiz Grades
This stage is used for students to see the quiz scores that have been uploaded by the lecturer/instructor in the relevant class.
The Steps:
- Open a class you are already following/related to.
- Press the three dots at the top right, then select “Quiz”.
- Select the quiz for which you want to see grades.
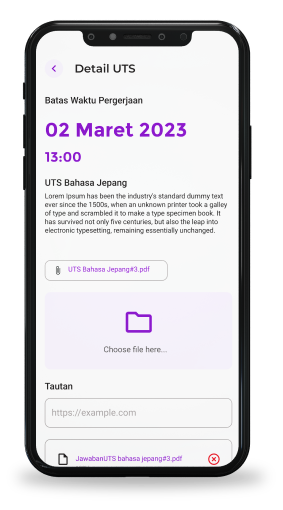
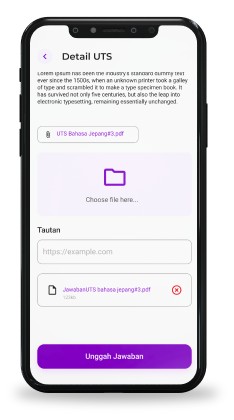
G. Download and Upload UTS (Midterm Exam)/UAS (Final Exam) Answers
This stage is used for students to download the UTS/UAS and upload the UTS/UAS answers that have been uploaded by the lecturer/teacher in the relevant class.
The Steps:
- Press "Open UTS" in the chat room that the lecturer has uploaded.
- Press the exam file then download the document.
- Press "Select File" to upload Exam answers.
- Input a link if the file uses a link.
- Press button "Upload Answers" to send the exam answer file.


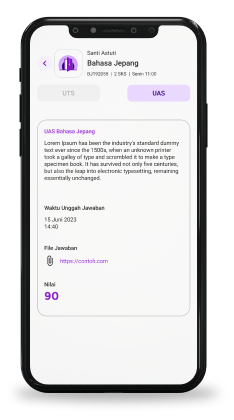
H. See UTS (Midterm Exam)/UAS (Final Exam) Scores
This stage is used for students to see the UTS/UAS scores that have been uploaded by the lecturer/instructor in the relevant class.
The Steps:
- Press button "Open UTS/UAS" in the class chat room.
Atau
- Press the three dots at the top right then select "EXAM".
- Press the UTS button if you want to see the results of the UTS scores obtained.
- Press the UAS button if you want to see the results of the UAS scores obtained.

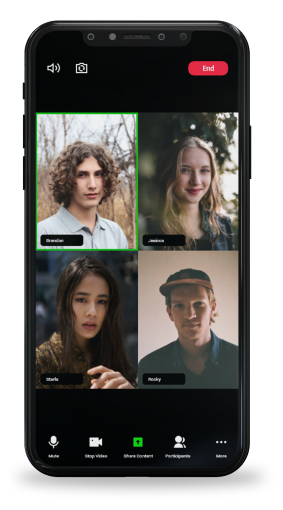
I. Participate in Video Conference Meetings
This stage is used for students to take part in online meetings that have been prepared by lecturers.
The Steps:
- Press the camera icon above after the lecturer opens the meeting session.
- It will automatically be directed to the Video Conference Application.